


How the proper use of reverb can improve your worship sound
Many larger houses of worship already have acoustical spaces with wonderful reverberant qualities. I used to teach a recording class back when the first affordable digital Definition:
A signal or data expressed as series of the digits 0 and 1, typically represented by values of a physical quantity such as voltage or magnetic polarization. reverbs appeared, and part of the lesson about reverbDefinition:
Short for Reverberation. The myriad echoes of decaying amplitude created in an acoustic environment. Reverberation may be simulated electronically, mechanically using springs or a metal plate, or in a specially built physical chamber with reflective surfaces where a speaker sends audio into the chamber, and a microphone picks up the reflections. was to take the class to a church down the street. I’d do a single handclap, and say “this is what reverb really sounds like.”
But in smaller houses of worship, or ones with relatively deadDefinition:
An acoustic space with no reverberation. acoustics, you might want to add some reverb to the choir’s mics to give a bigger sound, or a more “celestial” sonic quality. However, if applied improperly, reverb can make the sound less focused, or the words less intelligible—and you don’t want that.
REVERB OPTIONS
Before presenting some tips on how to get the best reverb sound, let’s briefly cover the two main reverb technologies used today. Algorithmic (or synthesized) reverb uses mathematical formulas to model the behavior of sound in various spaces. Convolution reverb, which is found mostly in computer-based audio processing (as opposed to outboard hardware units), works on a different principle. You can think of it as taking an “audio snapshot” (called an impulseDefinition:
1. A short or transient sound or electrical signal. 2. A specific type of short sound, used as the basis of convolution reverbs, which embodies the characteristics of an acoustic space. See: Convolution Reverb.) of an acoustic space’s characteristics, and then imparting those characteristics to your audio. As an analogy, consider the impulse as a “mold” of a particular space, and you pour the sound into the mold. If the space is a concert hall, then the sound takes on the characteristics of the concert hall.
Algorithmic reverb often provides a more impressionistic, airy type of sound, while convolution’s specialty is a realistic, “you-are-there” kind of vibe. It’s somewhat like the difference between a painting and a photograph; both can give enjoyment, for different reasons. However, most current hardware units are based on algorithmic reverb, which tend to have more editable parameters than convolution reverbs. Although the following tips are mostly about algorithmic reverbs, many of these techniques apply to a convolution reverb’s editable parameters. (Note: The product examples shown are all software plug-ins, although hardware units are also available.)
ADJUSTING PARAMETERS FOR THE DESIRED RESULTS
Decay time. Reverb has two main components (Fig. 1). First and early reflections simulate the initial, short echoes that bounceDefinition:
1. Reflecting ambient or sun light back to a filmed object. 2. In recording, to play back one or more tracks for recording into a different track (or sometimes, tracks), or to copy one track to another. off walls. Decay gives the long, reverberant wash of sound that most people associate with reverb. Although long decays can sound good in isolation, they usually don’t work well if other instruments are playing, or if the room has natural reverberation. Start off with a decay time between 1.0 and 2.5 seconds; too much reverb can overstay its welcome, and interfere with subsequent vocal phrases.

Diffusion. This parameter changes the time interval between early reflections. When there’s high diffusion, the echoes are spaced closer together, so the sound is lusher and denser (Fig. 2).

Some reverbs may call this parameter “density.” With low diffusion, the initial reflections are more sparse, and placed further apart. Higher diffusion works well with drums, which are already percussive—so having lots of discrete echoes spaced far apart sounds like marbles bouncing on a steel plate. However with sustained voices, as in a choir, lower diffusion settings give a less dense reverb sound that retains intelligibility better than higher diffusion settings.
Pre-delay. In an acoustic space, there’s a short period of time between when a sound occurs, and when listeners hear the first reflections. In a recording studio, where the goal is to re-create the sound of an acoustical space with reverb, using longer pre-delays can give the illusion of creating a bigger acoustical space. In a liveDefinition:
Live broadcast of an event or program without substantial delay or editing. situation, though, there’s probably an inherent pre-delay due to the nature of the acoustic space. So, you’ll likely want to set this parameter for minimum pre-delay.
High-frequency vs. low-frequency decay time. Some reverb units split the reverb decay into high and low-frequency ranges, with independent decay times for each of them (Fig. 3).

Generally, with vocals you’ll want a shorter low-frequency decay than the high-frequency decay. The low frequencies will be in the same range as other instruments and the lower vocal notes, so having sustaining vocals in that range competes with those sounds. This results in less “focus.” On the other hand, with most acoustic instruments (guitar, piano, bass) and voice, there’s not a lot of high-frequency energy. Adding reverb in that range fills a space that has less energy than lower frequency ranges, and also adds crispness and presenceDefinition:
An EQ effect that boosts audio, typically between 2 kHz to 7 kHz, to add clarity and articulation. to the vocals.
Equalization. If you can’t adjust high- and low-frequency decay times, there will often be an option to adjust equalization at the reverb input, or the reverb output (or sometimes, both). Cutting frequencies below around 200 HzDefinition:
Abbreviation for Hertz. Unit of measurement for frequency, formerly called CPS (Cycles Per Second), that measures periodic waves, audio and radio frequencies, and mechanical repetitive motion. Example: 1000 Hz means a periodic waveform has 1000 cycles/vibrations per second. or so before the reverb can clean up the sound, and is a technique used by many recording engineers (unless they’re looking for something like a “kick drum of doom” effect). At the output, reducing low-frequency responseDefinition:
The range of frequencies that an audio, video or data device can pass. and boosting the high-frequency response can produce results similar to adjusting the high- and low-frequency decay times, as mentioned above.
Damping. This parameter reduces high frequencies as the reverb decays. In a room with relatively dead acoustics, you probably won’t want to use too much damping, especially if you favor a crisper reverb sound. On the other hand, in an acoustic space with hard surfaces, a persistent, brightDefinition:
In audio, a sound quality that emphasizes high frequencies. Also called "crisp," "clear," or "sparkly." reverb may make the sound too “crispy.” In this case, you’ll probably want to increase the amount of damping.
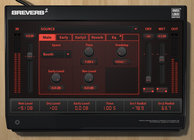
The reverb algorithm. Most reverbs offer a choice of reverb algorithms—large hall, small hall, room, chamber, gymnasium, plate, and so on. For choir situations, many people reach instinctively for the hall sound because after all, you want the choir to sound like it’s in a cathedral or concert hall. However, also consider trying the plate algorithm. Plate reverbs (Fig. 4) have a tighter, brighter, more diffused sound and are a popular choice for pop vocals. An existing acoustic space will naturally tend to more of a hall sound, so using a plate reverbDefinition:
A metal plate with mechanical drivers that convert electricity into vibrations that diffuse throughout the plate, and pickups that convert the resulting vibrations back into electricity, with the goal of simulating the sound of an acoustic space. See: Plate. on the choir can “separate” the vocals a bit more from the overall room sound, thus increasing intelligibility.

Reverb can be a seductive effect, and a common mistake is to use too much. It’s important to find the “sweet spot” between too much reverb, which clutters the sound, and too little reverb—which is ineffective. Armed with the knowledge above, spend a little time dialing in the right sound for your choir, preferably with the other musicians playing to give context. And of course, once you find the right sound, save it as a preset—you’ll probably want to use it again.
![Relab Relab LX480 Complete Most accurate emulation of Lexicon 480L [download]](/common/products/lg/332905.jpg)
![IK Multimedia T-RACKS-CSR-PLATE-RE Classic Plate Reverb Processor [DOWNLOAD]](/common/products/lg/330100.jpg)


